Using Audacity to prepare your audio for Murmur
Hi all,
I thought I'd write another "how-to" post, to help out with the audio processing for Murmur. I'm going to assume that everyone knows how to record, and import their audio to he computer, so this little guide shows you what to do after you have the file on your computer. First, a little background on why you may need to process your audio before it can be used for the Murmur project. Sorry for the geek speak that follows, but it helps to understand a bit more.
Sound "pitch" (i.e. whether a sound is low, like a bass, or high, like a flute) is measured in Hertz. Low sounds have low Hertz (100Hz) and high sounds have high Hertz (10000Hz). The human ear can hear sounds roughly between 20Hz and 20000Hz. That's why humans can't hear dog whistles for example, since they create sound above 20000Hz (dogs can hear up to about 40000Hz).
So, how does that relate to the project you ask? Because what WE hear is not neccesarily what the recording device picks up, and more importantly, NOT how a telephone works. Microphones vary greatly in the frequencies they pick up, and cheaper mics can exaggerate some frequencies more than others. In general, cheap mics will boost low frequencies, and cut high frequencies. This makes for a "boomy" recording, especially when recording a male voice, as the male voice is generally in the range of 150Hz. Under normal circumstances, this is not a big issue. However, it gets tricky when playing it through a telephone. Most telephones only transmit sound in the range of 300Hz to 3000Hz. And that's why it's important to process your audio for it to sound good on a telephone. You need to cut out that low rumbling streetcar sound and cut out the high pitched wind hiss in order for the voice to sound right.
So this is how you do it:
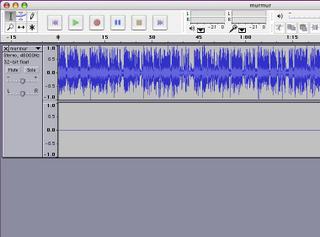
Start up Audacity (free download from http://audacity.sourceforge.net/ ). Open the file you recorded. Audacity will let you import WAV, AIF, or MP3 files. Once the file is loaded, make sure the sound is actually in stereo, or in mono. If the file is in stereo but the sound is mono, you will only be getting sound from one speaker (i.e. not good). In that case, the file will look like this (notice the straight line in the lower window):

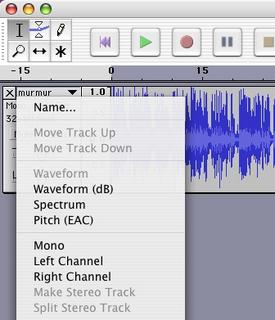
If your file is ok (already mono or proper stereo) you can skip to the next block of text. Otherwise, you can change it by clicking on the file name in the top left corner of your sound file (in the picture above, the word Murmur next to the "X"). Click your file name and select "Split Stereo Track". You will then have 2 seperate files. Close the one that has no sound (click the "X"). Then, in the remaining sound file, click the name again and select mono, as in the picture below:

Now to process the sound. Click "Edit" -> Select.. -> All. You should now have your file highlighted. Click "Effect" -> High Pass Filter. Enter a frequency between 400-600 and click ok. Then click "Effect" -> Low Pass Filter. Enter a frequency between 2800-3500 and click ok.
Finally, we will normalize the sound. Normalizing the sound ensures that the parts where the person was talking soft will be about the same volume as when they were talking loud. Click "Effect" -> Normalize, and click ok. Your sound should now be "telephone ready". BUT, by applying all those filters you may have lowered the volume of the sound. If you think it's too faint, click "Effect" -> Amplify, and click ok. Now save the file first so you don't lose anything, then export it as MP3 if you like (or convert to mp3 by another method of your choice).
Phew! Hope all this crazy nerdy info helps a few people to get better sound. :) Good luck.
A7

1 Comments:
Good background to the "highs and lows" of audio recording! This should help us all to get some great sounding audio. I find audacity somewhat counter-intuitive, so this is also a good primer for both the experienced and the novice user. Thanks again A7 for your really excellent tech advice and contribution to the blog, and to the [murmur] project!
Post a Comment
<< Home